EDI X12 Trading partner configuration in BizTalk
Introduction
In this blog post, we will explore the process of setting up trading partner configuration in BizTalk. This involves creating parties, configuring agreements, and testing the solution. Let's dive into the details.
Steps
Creating parties in BizTalk
To begin, we need to create two parties - one for our company and another for our trading partner. Let's start by creating the party for our company named "Vipin." Follow these steps:
- Connect to the BizTalk Admin console.
- Right-click on "Party" and select "New" -> "Party."

- Name the party as "Vipin" and click on OK

- Creating the party will also create the profile for you.


Understanding the X12 File
ISA*00*0000000000*00*0000000000*08*4532345856 *12*8038025150 *020624*1158*U*00401*000000009*0*P*>~GS*PO*4532345856*8038025150*20020624*1158*02*X*004010~ST*850*103465910~BEG*00*SA*0065-9182075-0579*123*20020624~REF*DP*065~FOB*DF*OR*FT ML SC~CSH*Y~ITD*01*2*****60~DTM*037*20020627~DTM*038*20020628~TD5*B*2*SOCS*C~N1*BY*WALGETS DC 0579*92*0579~N3*131 NORTH ROAD~N4*WILTON*NY*12831*US~N1*ST*WALGETS DC 0579*92*0579~N3*132 NORTH ROAD~N4*WILTON*NY*12831*US~PO1*20*96*EA*4.562*WE*CB*065052404*VA*G70122852*UP*490650524047~CTP*RS*RES*9.99********1~PID*F*73***NONE~PID*F*08***GLASS VASE~PO4*6~SE*21*103465910~GE*1*02~IEA*1*000000008~
Before proceeding, it's essential to understand the X12 file structure. The first two lines of the file, known as the envelope, are crucial for configuring the agreement. The first line is the ISA segment, and the second line is the GS segment. Each segment consists of multiple elements separated by delimiters (in this case, an asterisk), and each segment ends with a segment terminator (a tilde).
ISA*00*0000000000*00*0000000000*08*4532345856     *12*8038025150     *020624*1158*U*00401*000000009*0*P*>~
GS*PO*4532345856*8038025150*20020624*1158*02*X*004010~
Creating the agreement
The agreement is where you set up the envelope information and separators. Follow these steps:- Right-click on "ABCCompany_Profile" and select "New" -> "Agreement."

- Name the Agreement as "ABCCompany Agreement"

- Select the protocol as X12
- By creating the agreement, you'll notice two additional tabs: "ABCCompany -> Vipin" representing inbound flow and "Vipin -> ABCCompany" representing outbound flow.
Configuring the Agreement
- Check the check boxes as highlighted in the figure given below.
- Configure ISA05, ISA06, ISA07, ISA08 based on the input EDI file. Please refer the figure given below.
- Configure the Acknowledgements section as highlighted below.
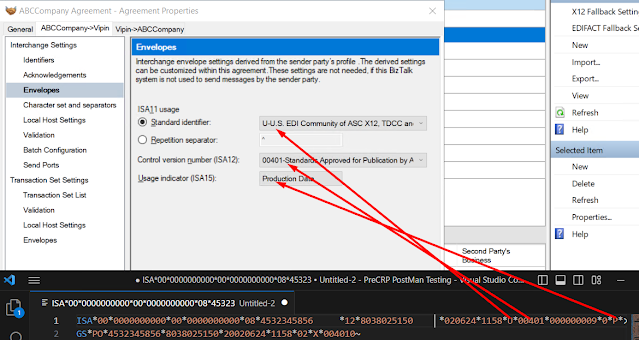
- Configure Envelopes. Configure ISA11, ISA12 and ISA15 based on the input EDI file
- Configure Character set and separator section as shown below.
- Let us maintain default settings under the Local Host settings
- Let us maintain default settings under validation
- Let us maintain default settings under Batch Configuration
- Let us maintain default settings under Send Ports
- Configure the Transaction Set List as shown below.
- Configure Validation as shown below.
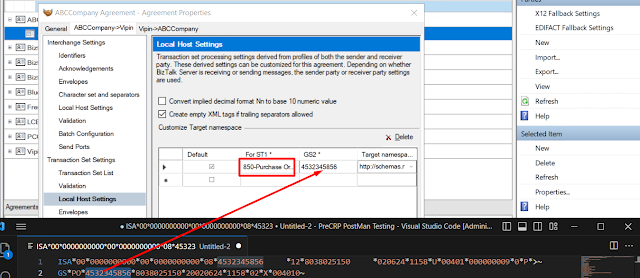
- Configure Local Host Settings as shown below.
- Choose the target namespace as shown below.
- Configure Envelopes as shown below.
From Vipin -->ABCCompanyNow let's configure the outbound flow from Vipin --> ABCCompany by referring the sample EDI file given below. Follow these steps:
- Go to the tab Vipin --> ABCCompany and configure the Identifiers tab as shown below.
- Configure the Acknowledgements as shown below
- Configure Envelopes as shown below
- Configure Characters set and separators as shown below.
- Maintain default settings under local host settings, validation, Batch Configuration and Send Ports
- Configure Transaction Set List as shown below
- Configure Validation as shown below
- Configure Local Host Settings as shown below
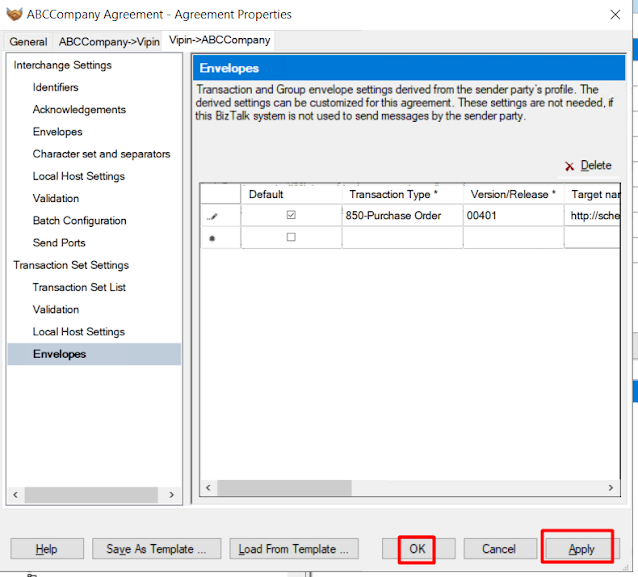
- Configure Envelopes as shown below
- Click on Apply and Ok
- You will now see that the agreement has been successfully created.
Testing the solution
To test the solution, follow these steps:
- Create a BizTalk application and name it as POCTradingPartnerConfiguration. Reference BizTalk EDI Application in this application
- Create a one way Receive port named as POCTradingPartnerConfiguration.RP
- Create a receive location POCTradingPartnerConfiguration.RL with URL "D:\Developer\Vipin\POCTradingPartnerConfiguration\IN".
- Reference the EDI receive pipeline in the receive location
- Create a send port name as POCTradingPartnerConfiguration.SP with the URL "D:\Developer\Vipin\POCTradingPartnerConfiguration\OUT". Configure the filter condition as BTS.ReceivePortName == POCTradingPartnerConfiguration.RP
- Restart host instances
- Test the solution by dropping a file in the receive location. You will see that the XML version of EDI file will be created in the send port.


Comments
Post a Comment